The most common outcome when homeowners skip structured planning? According to Houzz, 39% of homeowners exceeded their renovation budgets, with unforeseen costs and scope changes as the leading causes. That's not a fringe outcome—it's what happens without a clear roadmap.
This guide walks through every phase of a kitchen remodel in the order decisions actually need to be made. Whether you're planning a cosmetic refresh or a full gut renovation, the checklist approach keeps each choice in sequence and prevents the costly missteps that derail otherwise well-intentioned projects.
Key Takeaways
- Define your goals and scope—cosmetic, partial, or full gut—before any design decisions or quotes
- Budget honestly using current benchmarks, and always include a contingency buffer
- Cabinets must be selected first; they control appliance placement, electrical rough-ins, and countertop timing
- Verify contractor credentials through the California Contractors State License Board (CSLB) before signing anything
- Every trade follows the one before it, so correct sequencing prevents expensive rework
Phase 1: Planning — Define Your Goals, Scope, and Budget
Skipping this phase causes most remodel problems. The decisions you make here set the guardrails for every choice that follows.
Setting Goals and Identifying Pain Points
Start by answering three questions: What doesn't work functionally? What looks dated? And what's driving this project—daily frustration or future resale?
The answers place your project into one of three categories:
- Cosmetic refresh — Cabinet refacing, new countertops, hardware, backsplash, paint. Minimal disruption, no mechanical changes.
- Partial remodel — New cabinets and appliances, some layout adjustments, limited plumbing or electrical updates.
- Full gut renovation — Walls moved, plumbing and electrical relocated, everything replaced from the studs out.
Walk through your current kitchen honestly. Note what creates daily frustration: cramped prep space, poor traffic flow, storage that doesn't match how you cook, lighting that leaves the counters dim. That pain-point list becomes the project's priority guide and prevents you from spending on things that won't actually solve your problems.
Building a Realistic Budget
Before getting a single quote, establish two numbers: your total target budget and your contingency buffer.
National benchmarks for context (LA and Ventura costs typically run higher due to local labor rates):
| Scope | National Range | Houzz Median Spend |
|---|---|---|
| Minor/cosmetic | $10,000–$20,000 | $20,000 |
| Major midrange | $20,000–$65,000 | $60,000 |
| Full makeover | $65,000–$130,000+ | $180,000+ (high-end) |
Source: HomeAdvisor 2025 kitchen remodel cost data
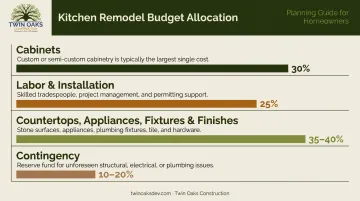
How to allocate your budget:
- Cabinets: ~30% of total budget
- Labor and installation: ~25% of total budget
- Countertops, appliances, fixtures, and finishes: ~35–40% of total budget
- Contingency: 10–20% reserved on top of your working budget
Invest more in cabinets, layout changes that improve daily function, and quality countertop materials. You can reasonably save on decorative hardware, backsplash tile, and paint. Skimping on structural or mechanical work—electrical, plumbing, framing—creates problems that cost far more to fix later.
Twin Oaks Construction serves homeowners across LA and Ventura Counties and offers free consultations to help you build a realistic, project-specific budget. Reach out at twinoaksdev.com/contact or call (833) 621-7251.
Phase 2: Design Selections — Layout, Cabinets, and Surfaces
This is where the vision becomes concrete. Choices made here determine how every trade sequences their work—so selections must happen in a specific order.
Planning Layout and Workflow
Layout determines whether your kitchen is a pleasure to work in or a daily obstacle course. The NKBA's Kitchen Planning Guidelines provide the key measurements:
- Work triangle total: 26 ft. maximum (sink, range, refrigerator)
- Each triangle leg: 4–9 ft.
- Work aisle: 42 in. for one cook; 48 in. for multiple cooks
- Walkway minimum: 36 in.
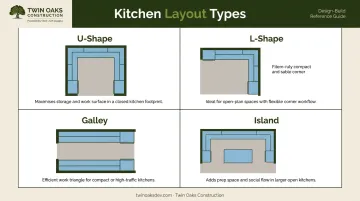
Common layout types:
- U-shape — Maximum storage and counter space; works well in larger kitchens
- L-shape — Flexible and open; accommodates dining areas naturally
- Galley — Efficient workflow; can feel tight with more than one person cooking
- Island — Adds prep space and seating; requires adequate clearance on all sides
One practical note: keeping your existing layout saves significant money. Moving plumbing or walls adds both cost and complexity—often $5,000–$20,000 or more depending on scope. Measure the actual space before finalizing any layout decision.
Selecting Cabinets, Countertops, and Surfaces
Cabinets come first. Their dimensions control appliance placement, electrical and plumbing rough-in locations, and countertop templating timing. The three cabinet types:
- Stock: $100–$400 per linear foot; limited customization, faster delivery
- Semi-custom: $150–$700 per linear foot; more size and finish options
- Custom: $500–$1,200 per linear foot; built to exact specifications
Key decisions beyond cost: door style, finish, and functional storage features like soft-close hinges, pull-out shelves, and drawer organizers.
Countertops come next. Templating can only happen after cabinets are installed. Quartz dominates current homeowner selections at 43%, followed by granite at 26%, according to Houzz 2025. The top priorities homeowners cite: easy to clean (69%), durable (60%), and stain resistant (59%). Choose your countertop material before selecting your backsplash—these surfaces need to work as a coordinated system, not as isolated decisions.
Before cabinets are ordered, confirm these details with your contractor:
- Appliance dimensions — exact specs must be locked in before cabinet orders; surprises here are expensive
- Electrical capacity — induction cooktops and dual-fuel ranges draw significant power, a real issue in older LA County homes
- Sink and faucet type — determines plumbing rough-in positioning
- Lighting plan — ambient, task, accent, and under-cabinet lighting must be designed now; cabinet height and layout control wiring runs
- Outlet placement — confirm locations before walls are closed
Phase 3: Hiring, Permits, and Scheduling
Even a perfect design falls apart with the wrong team or a poorly managed schedule.
Finding and Vetting the Right Contractor
In California, contractor verification isn't optional—it's how you protect yourself legally and financially. Check every contractor through the CSLB's license verification tool before signing anything.
What to verify:
- Valid California contractor's license (B General Building or B-2 Residential Remodeling, depending on scope)
- General liability and workers' compensation insurance
- References from recent kitchen projects specifically
- A clear written contract covering scope, payment schedule, change-order process, and timeline
Red flags to walk away from:
- Large upfront payment demands (California law caps deposits at $1,000 or 10% of contract price, whichever is less)
- Vague scope language in the contract
- Unusually low bids that don't add up against material and labor costs
- No verifiable license or insurance
Twin Oaks Construction has handled kitchen renovations across LA and Ventura Counties for over 20 years, managing everything from initial permitting through final inspection. For homeowners who want a single point of contact instead of coordinating multiple trades, that structure matters.
Once you've selected a contractor, the next step is understanding which permits your project requires—and how that shapes the work sequence.
Permits and Sequencing
California requires permits for structural changes, plumbing relocations, electrical upgrades, and gas line work. In Los Angeles, PermitLA clarifies that a combined kitchen permit covers cabinet, flooring, counter, and fixture replacements—but wall changes or new plumbing and electrical penetrations trigger a full plan check at 1/4 inch to 1 ft. scale.
Skipping permits creates real exposure. California's disclosure requirements obligate sellers to report unpermitted alterations, which means uninspected work becomes a liability at resale—not just a technicality.
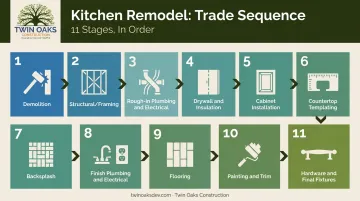
The correct trade sequence:
- Demolition
- Structural/framing work
- Rough-in plumbing and electrical
- Drywall and insulation
- Cabinet installation
- Countertop templating and fabrication
- Backsplash
- Finish plumbing and electrical
- Flooring
- Painting and trim
- Hardware and final fixtures
Order long-lead items—cabinets, specialty appliances, custom materials—as early as possible. Get vendor-specific lead times in writing at the time of order; don't rely on general estimates.
Phase 4: Living Through and Finishing Your Remodel
During the Build
Set up a temporary kitchen before demolition: microwave, mini-fridge, coffee maker, and a dedicated cleanup station. Seal adjacent rooms with plastic sheeting and establish a clear construction entry point to minimize dust spread.
During active construction, monitor without micromanaging:
- Verify cabinet installation is level, plumb, and aligned to plan
- Confirm rough-in work matches appliance specs before walls close
- Report damaged materials or finish defects immediately—they're far easier to resolve before surrounding work is complete
- Put any scope changes in writing right away
The Final Walkthrough
Once construction wraps up, your attention shifts from monitoring progress to making sure every detail meets your expectations before you sign off.
Don't release final payment until you've completed a thorough review. As a California homeowner, withholding final payment until work is fully complete and meets your satisfaction is both a reasonable expectation and a recognized consumer protection practice under California law.
Walkthrough checklist:
- Test every appliance, drawer, and cabinet door
- Check all hardware is installed correctly and operates smoothly
- Inspect finish quality on painted surfaces, tile grout, and transitions
- Verify all permits have been inspected and closed
- Collect warranty documentation for appliances, cabinets, and contractor workmanship
- Confirm any lien releases if applicable
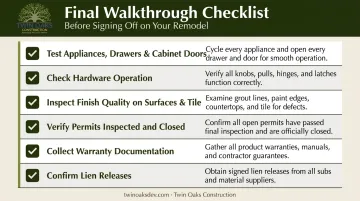
Catching issues at this stage is far easier than addressing them after the fact. That said, the CSLB gives California homeowners four years to file a complaint on a faulty project — with potential extensions if additional warranties are written into your contract.
Common Kitchen Remodel Mistakes to Avoid
Planning Mistakes
- Starting design or ordering materials before scope is fully defined—this is the fastest path to scope creep and budget overruns
- Skipping a contingency budget. A single unexpected issue—outdated wiring, hidden water damage, or asbestos in pre-1978 LA County homes, which triggers EPA lead-safe certification requirements—can stall a project entirely
- Choosing style over function. A kitchen that photographs well but fights you every morning isn't a good kitchen—it's an expensive inconvenience
Execution Mistakes
- Ignoring trade sequencing. Each phase creates the conditions the next depends on; shortcuts here cause expensive rework
- Failing to verify appliance dimensions against cabinet plans before ordering
- Treating lighting as an afterthought rather than an early planning decision
Contractor and Communication Mistakes
- Hiring based on lowest price without checking license or references
- Accepting vague contract language on scope, payments, or change orders
- Going weeks without a check-in. Small misunderstandings compound quickly when left unaddressed
Frequently Asked Questions
What is the 30% rule in kitchen remodeling?
The 30% rule is a general guideline—not an NKBA standard—suggesting you spend no more than 30% of your home's market value on a kitchen remodel, since costs beyond that point are unlikely to be recouped at resale. At current Zillow averages for LA and Ventura Counties (~$888,000), that ceiling lands around $266,000, well above what most remodels actually cost.
In what order should you remodel a kitchen?
Demolition → structural/framing → rough-in plumbing and electrical → drywall and insulation → cabinet installation → countertop templating → backsplash → finish plumbing and electrical → flooring → painting and trim → hardware and final fixtures. Each phase creates the conditions the next one depends on, which is why the sequence isn't flexible.
Is $10,000 enough to remodel a kitchen?
It can cover a cosmetic refresh—new cabinet doors, hardware, countertops, backsplash, and paint—but falls short for anything involving new cabinets, appliances, layout changes, or mechanical upgrades. In the LA market, even modest remodels typically run higher due to local labor and material costs.
How long does a typical kitchen remodel take?
Houzz reports that kitchen renovations averaged 5.1 months of active construction, with planning adding another 9.6 months for major projects. Budget extra lead time for custom materials and permit approvals, which are common causes of delay in the LA market.
Do I need permits for a kitchen remodel in California?
Yes—structural changes, plumbing relocations, electrical upgrades, and gas line modifications all require permits. In LA, cosmetic swaps (cabinets, counters, flooring, fixtures) may qualify for a combined permit without a plan check, but any wall, opening, or new mechanical work requires full plan submission. Confirm the specifics with your local building authority.